Thalmor Robes – Assembly
again, simple solutions. once i decided i was not going to bleach and redye or buy new fabric and start over i went ahead and sewed my robes. at first i was trying to think how i would pattern the top part of the robe and then it struck me… its a basic T-tunic with the front cut off! joy, those are EASY to make and it helps me avoid my sewing nemesis – sleeve attachment.
so your basic, straight from the SCA garb handbook, T-tunic is a piece of fabric thats pretty much wide enough to go from wrist to wrist (luckily for me, the duck is close enough since the gauntlets will cover the ends), folded in half top to bottom, then folded again side to side. there are several sets of instructions online for measuring and whatnot so i’ll just link to one and skip describing whats already been described. here’s one: http://iollan.com/archive/rencester/new/tunic.html
so i cut it out and sewed it up the sides, then split it down the front. the biggest pain as always is hemming the neckline. tedious and annoying. hem the front and bottom with a rise in the back. i totally cheated on the sleeve and lower robe hems by putting them on the finished edge of the fabric. all the edges will either be covered by other parts or by trim so it doesn’t matter much.
the only detail pic i have for the back of the robes is this one. if anyone figures out how to get screenshots off a PS3 let me know (for now i have to use my phone).
the skirt was somewhat easy. easy in concept anyway. i am leaving out the details of holding fabric to myself, marking with chalk, measuring measuring measuring, cutting, etc. but anyways it was a trapezoid that extends from my hips to almost the floor. and no hemming the bottom, WOO! originally i thought id have to make it a separate piece from the outer robe so it wouldn’t pull on it funny but it turns out it did not and its all one piece. yay for simplicity.
sorry it was too dark to appreciate much. probably would’ve helped to not be wearing a black shirt, but i did courteously switch from my original pants that day which were black yoga pants so there ya go.
i was actually pretty pleased with how they came out.
next i tried out my idea to treat the fabric with brown pastels. in brief i mark the fabric with the chalk and then dust it off with a poufy paint brush to soften the effect. i tried to put darker marks on the creases and then get an overall dusty look to the fabric itself. it did not work to try to get pastel dust onto the brush and then dust the cloth. just didn’t. afterwards i sprayed it down with a product made to fix pastels and keep them from smudging. worked pretty well, once dry i didnt get any brown smudges on my hands from handling the fabric and it seemed to stay on.
in the light it looks pretty good. if its a little darker its not very visible. i will probably layer more on again. to make it more apparent. the pic on the right below shows a piece i treated next to some untreated.
coming soon!
probably a miscellaneous post with trim (1/3 done) and ear piercing and then maybe a separate post on making the mantle and other leather pieces (in progress).
later is painting the prosthetic (eek the commitment!) and making belt and the buckle and a dozen other details. and cutting the hole in my robes for the tail. kinda being a chicken about that too.
Thalmor Robes – in the beginning
first off, source pictures are very important. when i initially searched for images the pickings were slim. when i ran into some frustrations with the robes i looked again and found a lot more images that were a big help! they also pointed out a ton of extra details i hadnt originally planned on constructing but oh well. so here is what im going for. (sans hood, cant cover up those ears, can we?)
so looking at these pictures it appears the robes are made out of very dark brown or black dusty/worn out leather. well im not made of money and i plan to wear this thing in friggin August in Atlanta so we wont be doing that. so i chose cotton duck/canvas fabric because it has a good weight to it to give the right appearance.
my original pictures made the robes look a lot more brown than these more recent pictures. either way it was going to take some dyeing. i purchased natural (off white) cotton duck and washed it. then i dyed it with Dharma Trading Company fiber reactive dye in Truffle Brown which looked dead on the right color. heres the first dyeings results.
LAVENDER! the picture doesnt even do it justice that it came out mauve/lavender/purply-pink. you cannot be badass in MAUVE. just not possible.
so time passes, life happens. in the meantime my friends who helped me with the first dyeing tried overdyeing with green (thanks to the source pics somewhat) to take some of the red tones down. then we have:
so more to do. i gather my supplies for a shoot-for-the-moon, lets-get-this-thing-dark-brown dye round. by the way this is how much SALT that takes.
i used all that was left of the Truffle brown dye, and mixed in some black to get it nice and dark. and what i got at the end was a stained washer and this.
a near perfect BLACK. no green, blue, purple, or brown tones to it. a straight up black. what i know of dyeing is that its kinda hard to do that on purpose but i can sure do it on accident. sad thing about black is that means you are done as far as changing the color with dye unless you bleach it. i really didnt want to do that. i really didnt want to go buy more fabric and start over.
i had another heavy duty pout fest. which led to the new Google image search and my current sources which made me think, maybe i dont have to scrap this black. honestly, i was looking hard for a reason to carry on with what i had. fortunately i found some. so the images i have now show it as a dusty, this-is-what-black-matte-leather-looks-like-after-several-hard-years color. i can work with that. i have three main ideas of what i might do to give those brownish highlights and dusty tones to the black.
1. crumple, bleach lightly, overdye with brown
2. paint it with acrylic and then sand as described here: http://reviews.ebay.com/How-To-Paint-On-Fabric-And-Getting-That-Leather-Look?ugid=10000000003442781
3. (tonight’s epiphany) use pastel chalks and dust/rub it on the black.
im liking number 3. its potentially very fast and easy and what better way to get a dusty look than something that is actually dusty! im going to experiment with it first, maybe using a poufy brush to literally dust it on, drawing on the fabric with it, and just getting my hands messy and going nuts with it. we will see how that goes. the next challenge will be how to make it stay put and not get all over everything i touch. im thinking something like spray adhesive or hair spray. open to suggestions.
regardless of how i get the color right, i decided i needed to go forward with assembly of said robes so i went ahead with it and had them completed in half a day (with me sick i might add/brag). that will be another post.
parting thoughts. when dyeing, wear gloves. long ones.
Khajiit / Cat ears
gotta have ears! looking at the pictures available i knew they would have to be in the neighborhood of half the length of the head in height (without the lynx-y tufts). they also sit pretty laterally, right above where my actual ears are, as apposed to on the top of the head like most costume cat ears. getting the right mounting and size was tricky.
i mainly worked with craft foam as a base, wire for support, elastic later upgraded to clear rubber elastic, and hot glue to hold it all together.
getting the bend to it helped the shape. the mounting was essentially elastic at the front and the back of the bend across the crown of the head, then one below going around the back. used wire to keep the bend and add some adjust-ability to it later.
the scale originally looked good and the shape…then i added the fur and things got odd. i was very proud of how the fur looked in and of itself. i cut it so there was a white interior, and a spotted brown exterior, it fitted together well and the hot glue did well. however it added about 2.5 inches to the height and made it turn forward looking more like a bunny than a lynx.
when those pics were taken i was not a happy camper. i did not want to recreate all that fur work i was so proud of and couldnt figure out how to bring the ears down in relative size and fix the shape.
for the record the way i strung the rubber elastic was with a spear shaped leather needle which punched through really well.
after pouting, sleeping and showing the ears to some friends, we determined that beyond the obvious extra size the fur added (which would take a complete do-over scaled down to change) the issue was that the ears were sitting too high on the head and not sideways enough. you see a lot of the crown in the source pictures. so the solution was to bend the front more, move the elastics further back and lower the overall mounting. this was the result.
**apologies for the poor lighting in all my pictures. my kingdom for overhead lighting!**
lowering the ears and turning them outwards i think helped a lot. less bunny-ish now. still debating on coloring the tips black or adding black hair to make them into obvious tufts. my husband says they are perfect as they are. i still feel they are a little big but im gonna step away from that battle for a little while.
the next issue was what to do with my actual ears. i can easily style my copious hair to cover them for most angles but it would be really lame to have them show through if it shifted. i experimented with extending a flap of fur below the ears and it looked terrible. im thinking of either covering them with little brown pantyhose covers so they blend with my hair even when they show through or something to that effect.
oh and i absolutely intend to add earrings. just gotta go shopping for the right ones. but oh yeah this khajiit does piercings!
On making a tail – 3: the Reckoning!
if i have learned one lesson in making this costume it would have to be that “sometimes the simplest solution is the best solution.”
i knew i wanted a tail with some good fluid movement, not too bulky, not too heavy, and easy to make. i had the epiphany after making the foam tail and Google searching alternative materials to try rubber/vinyl tubing as the structure and just cover that with the fur. and it was PERFECT (or as close as i expect to get)! very natural sway and bounce movement, appropriate thickness, cheap and fast to make.
so i went to Lowe’s and found this vinyl tubing in the plumbing department. i bought probably 5 or 6 feet so id have some spare in case i messed some up. not very cost prohibitive at all.
for the fur cover i pretty much measured the circumference i needed, added a little extra to compensate for the fur being double layered and sewed a tube. the absolute biggest pain in the butt was turning the tube rightside out. it was a tight fit and pretty much took a long stick and a lot of cussing to achieve turning it out. the length of the fabric was pretty much the length i wanted so no adding or trimming on that. it fit over the tube perfectly adding a little extra thickness.
before covering the tube i mounted it to the base for the belt. i wanted it to stay as flush as possible to my lower back so it would arch out well so i used some scrap ~ 1/8 inch thick leather as a base. marked where the tube would go (after cutting the end at a slight diagonal to get the angle to the back right. i cut slots and attached the tube with zip ties since they are bendable yet pretty rigid when they are in place. ended up using a double “t” to get it to sit right.
then i just attached some wide elastic and voila a tail on belt! it gaps slightly at the top so i later added a thick strap to the top for stability and it is a little less. in the final incarnation i may exchange the elastic for fabric and have it go all the way across. really its not enough that it will be terribly noticeable under the robes.
then i put the fur over the tube, cut the tube to appropriate length, handsewed the end closed and stitched the top around the zip ties.
its got a really nice movement, and since i was careful to mount it in line with the natural curl the end curves up while the top is weighted down enough to roll nicely (even if the tube does a full bend its not noticeable), and it doesnt twist to the sides. i did waste a good 15 minutes or more trying to heat the tube with a hair dryer to see if i could fight that curve and make it arch perfectly permanently. not happening. you can see below if its not fighting gravity it curls right up. but its ok when you wear it. so i guess its not important.
so tail is pretty much done. next, the ears!
PS i realize i have been misspelling Khajiit by adding an unnecessary D to it. oops!
on making a tail – 2
yeah im a procrastinator. now returning to construction on my Khadjiit costume for DragonCon.
so i started working on the foam tail method as shown at http://www.youtube.com/watch?v=XgOCVyBgjaA and http://www.youtube.com/watch?v=5kCpe2DlFxQ&feature=related.
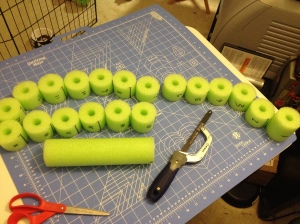
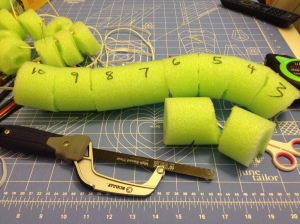
first i cut a $1 pool noodle into 2-3″ lengths, numbering and making a line at the top to keep it straight where they connected. then you cut wedges out of the top, bottom, or sides to give it the shape you want like the classic kitty tail S-curve.
Then i poked a pen through the top and ran a straw through it. then i connected the hole thing with an elastic cord through the top and a rope through the middle. i stabilized the top and bottom or sides, depending on how i wanted it to move in a given area with hot glue.
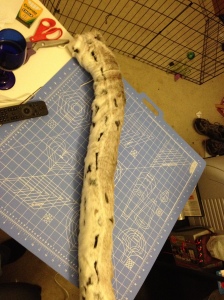
Unfortunately when i wrapped the fur around the foam skeleton it just seemed way too thick for what i was looking for. if i were wearing a fur suit it would work but for a thin cat tail its not what im looking for. back to the drawing board…
DragonCon cosplay phase 1(ish)
finally getting going on my DragonCon projects. this weekend and last i made my foundation tunic for the Thalmor robes, worked on the belt buckle, and started working on the blaster for my Star Wars The Old Republic cosplay of Vette.
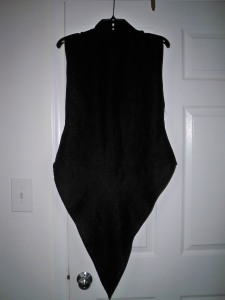
the undertunic for the Thalmor robes was pretty straightforward, a simple sleeveless tunic that came to a point in front with a mandarin-style collar and some subtle details on the bottom. the only visible part will be the front centermost part. i made up my own pattern and cut it out of some leftover black linen i had on hand.
here is the early stages. i am also displaying the khadjiit ears that will be. very catlike.
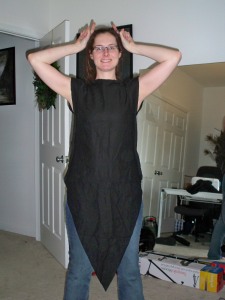 unfortunately i cut the neck too wide so the collar took a lot of adjusting to get it to look right-enough to pass the “10 foot rule.” the armholes initially had to have a gore added and then they were huge. adjust and readjust. eventually it looked good enough that if i end up taking off the overrobe in public i wont be embarassed about whats underneath.
i added the subtle design on the bottom with the same wide/tight stitch i used to finish the open seams of my dance bra and was very pleased with the effect. i knew i didnt want to use ribbon or god forbid hand make a ton of trim to sew on. unfortunately in the pictures the chalk lines i used to draw out the pattern show up but you can pretty much see what it looked like.
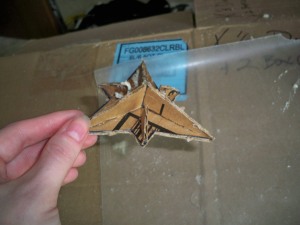
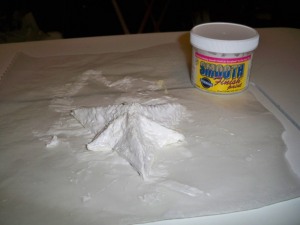
next i started working on the belt buckle. my plan was to make the basic 3-D shape out of cardboard hot-glued together then cover that with Great Stuff expandable foam, carve it, and paint it. this material and technique is borrowed from professional cosplayer extraordinaire, Kamui (http://www.kamuicosplay.com/).
in the 3rd picture the belt buckle is the blob in the lower right. the blob on the left will hopefully become one of my blasters for Vette. i had this paint/sealant stuff from a while back that is supposed to make styrofoam nice and smooth so i wanted to try it on the great stuff foam. thus far im not liking it and will probably go forward with the taping and paper mache technique Kamui uses. so much for short cuts.
for the blaster my hope is to end up with something like this
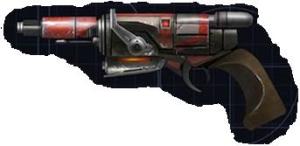 sorry, forgot to take pics of my cardboard build. we shall see how it goes. my carving skills are not very good as you can see from the belt buckle. also i hope to put a couple LEDs in it too but i wonder where does one put the switch and battery on/in something like this.
alongside my efforts, kenneth is experimenting with making his lightsaber hilt in the same way. currently it looks like this
 it takes a long time for this foam stuff to harden and then it is very messy to carve. the framework of the cardboard helps cuz freehanding is ridiculous.
thats all for now. next weekend i hope to dye my canvas so i can get started on the overrobes and skirt of the Thalmor set. in the meantime i think we are going to focus on making our props. also considering ordering some Wonderflex to make armor for Kenneth’s sith and maybe a few other things.
Belly Dance Bra (to match the previous mini skirt)
better late than never. so i made a bra to match the miniskirt i had already made. i forgot to take pictures while it was actually in process but i can describe it well enough to get the idea across i think. a major source of inspiration and instruction i used was the book Bedlah, Baubles, and Beads by Dawn Devine (i bought it on Amazon) as well as the shira.net website (http://www.shira.net/costuming/cg/bra-cover.htm).
so i started with a buy one, get one free bra set from target. i am a little small chested so i knew i’d need to go a size up and pad a little. also if you’re covering, reinforcing, beading, or coining a bra its actually good to go a size up anyway because all that covering shrinks the bra cups a little. remember its the cup size and shape you need to get right, the straps don’t matter because you are going to cut them off.
in the picture below the cut lines are shown in yellow. i had to change the shape of the cup where i cut the shoulder straps away since they were integrated into the cup. keep in mind when you cut that the shape which angle the cup will be tilted.
if you are small chested you can enhance your size in two ways prior to padding: 1) angle the cups diagonally (bringing the outer sides upwards so that things are directed to the center, looking at the picture tilt the cup on the left clockwise and the one on the right counterclockwise) and 2) shrinking the tap between the cups thus squeezing the girls together. in the end there wasn’t much smaller i could make the center tab and i tilted the cups moderately but not a ton.
so after you’ve cut you end up with just the cups themselves. this was a foam/molded style bra with no padding, some structure, but not enough to hold up if you are going to add a bunch of coins or beads that will weigh it down. so i had to reinforce it with non-fusible heavy interfacing. now the book i had read like you would cover the outside with interfacing which just was not working for me. Shira.net suggested lining on the inside which worked great since it wouldn’t leave ugly seams. this i hand-stitched in and cut as i needed to make it flush to the cup while still trying to minimize cuts so i didn’t lose support. here’s the lining.
since i didn’t take pics in-progress you get to see the details of where i hand-stitched the cover, center tab, side straps, and shoulder straps on.
for covering cups, the fabric i used had a great multi-directional mild stretch/weave so i used neither the book’s nor the websites recommendations for covering. i was able to use one solid piece without darts to cover the cups. my only regret is i didn’t have both cups covered with the same alignment/grain of the fabric so the shine comes out in odd directions to each other (one at a perfect diagonal from 1-7 o’clock and the other going 2:30-8:30). perhaps that’s a detail only the maker’s scrutiny will notice. hope so ‘cuz i am totally not redoing it. =)
for making the side straps i cut the shape so that when finished the top line would run straight (perpendicular to the body) and the bottom would angle from the cup to the desired width of the strap at the back (1.5 inches to fit the D-rings and the ribbon i used – the same as for the skirt). i cut it on the fold so i would only have one side to sew up later. the shape was like a long triangle almost. the shoulder straps i just made straight so they started at 1.5 inch and ended that way and would reach from the bra cup to just over the tops of my shoulders. again cut on the fold and save the extra work. i made the center tab the same way as the straps.
i really wanted the straps and center tab to have some nice structure so they wouldn’t crumple when i put tension on them. so after i cut them i took fusible heavy interfacing and ironed it to each side of the fold on the wrong side of the fabric (i made the interfacing slightly smaller than the end strap size so i’d have room to fold it and fold in the open side. i closed the open side with a tight overcasting stitch which came out so nice! unfortunately, i figured that out after i made and sewed on the center tab which i hand-stitched and it didn’t look nearly as nice. might actually correct that later.
the center tab and side straps were hand-sewn onto the cups before the shoulder straps. placement-wise for the shoulder straps it was trial and error (AKA “honey, how about this way? this way? does this look even?”). the side straps were measured to where i wanted to put the D-ring (not meeting each other so i could do the X-cross back). then i folded the strap over and basted it. rechecked it. then i fancy-stitched it (which is actually a very sturdy stitch) and removed the basting.
i split the remainder of my red ribbon from the mini skirt ties. this i attached to the ends of my shoulder straps by leaving that seam open until i put a 1/4 to a 1/2 inch of the ribbon inside the strap and then fancy-stitched over it.
and here’s the criss cross back (please ignore mess in background)
due to running out of time before the performance i intended to wear this outfit at and indecision over how i wanted to bling it out, i left it plain. i am really torn as to what to do additional to it (if anything). i love the fabric so much i hate to cover it, honestly. my original plan was to bead or mirror the top part of the cups and have a line of dangling coins along the apex of the bust-line (curving from the sides down the to center tab). open to opinions as to whether to add anything or not.
so here’s the finished product in action!
actually forgot to bring the pads and put them in for the show. it fit well enough because as i mentioned, covering and reinforcing shrank the cups down a good bit.
in addition to the possibilities of To Bling or Not To Bling with the bra, i am also considering adding some of the purple ribbon to the back as a loop and bow that only goes between the two D-rings to set a steady chest band width. what i realized on day-of-show (told you, finished this thing last minute as in the morning prior) was that the criss-cross will allow the sides to loosen a little and i didn’t want the bra to come up on the bottom so i had to have it tied super-kindof-uncomfortable tight just to be sure. the two bows might also be pretty and add more interest to the back.
so there you have it. my new matched bra and miniskirt outfit. i wore them over my MeloPhoenix pants (sorry didn’t end up in the picture) and i think the overall outfit was pretty darn cute.
questions? comments? thanks for the feedback!
next project – get on the ball making that DragonCon costume!
Red BellyDance miniskirt
so for my upcoming performance i wanted to wear my new pants from Phoenix Rising Artists but i needed some new costume pieces to go with it. i found a gorgeous fabric in my stash that was perfect to turn into a new mini overskirt and bra.
the colors came out a lot pinker in the pic but the gist is its a red that irridesces a indigo/purple. i picked up a few complimentary ribbons to work as a waistband. i made a couple drafts out of some icky colored fabric i had on hand because i wasnt sure if i wanted to do a more flatfront style (left) like the one i made before or try for a pleated bustle-y style (middle and right).
as you can see it came out more catholic uniform skirt than bustled so i went with option A.
i took special care making this one cuz the fabric is gorgeous and ill never find more. i even ironed it (OMG!) which brought out the sheen of it in a pleasantly surprising way.
here i have the waistband ribbons pinned on. the ends will trail on each side to give it a nice movement.
this is pretty much the finished product with the coin belt i want to wear over it for the show. strangely the colors in the skirt, pants, and belt dont match at all but they seem to go together beautifully (at least to me and Kenneth). the skirt also moves very well. so pleased.
the next mission is covering a bra in the same red fabric. i started today trying to cover it with a heavyweight interfacing to give it more stability but it is not working very well. just too stiff. i am totally open to any tips anyone might have. otherwise i may try covering the bra in a lighter interfacing and doing more than one layer or using another fabric from the stash. again, suggestions welcome.
more later!
creative ADD or What to do next?
i guess i dont have to have a project with pictures to make a post, huh?
im really unsure what i want to do next. i definitely have plenty to do for the 1) DragonCon Khajiit costume, 2) want to make a coverup for performance days, 3) want to make my first cabaret-style beaded bedlah or bra/belt set in the Sahara’s treasure gold, 4) want to make a couple costume pieces for my solo at Shiver Me Shimmies, 5) there’s also the Twi’lek costume for DragonCon… and theres more i could make
1) waiting to dye a bunch of fabric for the robe. cat prosthetic is still in limbo (bought but not shipped yet). can make the undertunic, have the fabric. will need to make a trip to Tandy Leather to make the mantle. either order the noodle for my tail base or wait to pick it up when it gets to summertime. gotta make the ears…due date is the end of August but its a big multi step process and dont want it to sneak up on me.
2) have some beautiful red linen that would be perfect for a bellydance coverup. want to find a nice trim (or many of them) to embellish it. also want some fancy closures. thinking of giving it a kaftan shape with a little bit of SCA/Medieval flare. maybe dag the sleeves more than usual or something. could use this is as early as next month but its not super critical.
3) have a beautiful champagne-y gold chinese brocade with flowers on it. thinking of doing medium to light beading. might need to pick up some buckram to give a little more stability. and then beads. due date is open, maybe this summer or next october or even later. but itll be sparkly.
4) totally plan to wear my new Melophoenix pants with the burgundy and black damask pattern. but with what? need a belt/scarf to wear. may order a fringe scarf (what color?), wear my blue and silver beaded coin belt, and/or make a little mini skirt to wear. and then the top? my feather and coin bra? make a new one? modify the silver/blue beaded top that matches the belt? due date March 17.
5) gotta make the head tentacle thingies. assemble then outfit. really this is on my lowest priority. due date late August.
projects projects projects…
also have to finish the solo choreography and then practice it into the ground so i bring the house down. have about 4/10 of it done. its to Beats Antique’s “Egyptic” (shortened). going for a big isolation showpiece and am coming up blank on what to do combo-wise. gonna keep messing with it. wish me luck!
tie top finished!
last night i finished the tie tops for myself and Karen for our class performance with Nadirah Nasreen. i feel successful with the result, fit, and finishing. there are a few flaws but overall quite nice and will certainly serve their purpose.
funny we did pretty much the same pose without direction. heehee.


